GreenRope Blog
Title search: ✖
|
Show All (637)
#CoolerChat (7) All About GreenRope (172) Content Marketing (66) CRM (191) Customer Experience (79) Digital Transformation (8) Email Marketing (6) Event Recaps (2) Everything Small Business (46) How-To (136) In the Clearing with Lars (25) Infographics (4) Marketing (149) Marketing Automation (60) Monthly Updates (26) Press Release (1) Sales (76) SMB (140) Social Media (20) Tidbits for You (116) Websites & SEO (4) Weekly Roundup (16)
10 Surprising Things You Didn't know about Client Services & Search Marketing Manager, Lisa Frampton
Disqualifying Leads Without Alienating Them as Future Customers - Part 2: Cultivating Non-Leads with Automated Marketing
4 Ways to Get Your Email Marketing in Front of the Right Audience Through Personalization & Segmentation
Total Cost of Ownership: What does it mean and how can you avoid costly, unsuccessful implementations.
|
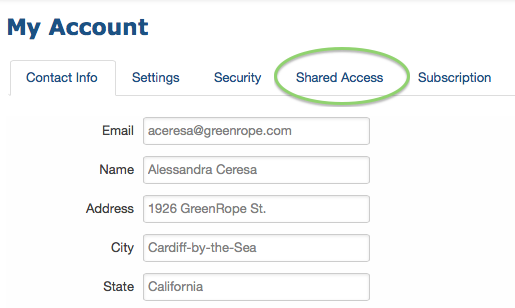
Your Guide to Adding Users & Giving Shared AccessGreenRope is made to build collaborative teams. Unlike some systems, GreenRope allows you to have as many users as you need granting them separate permissions to different parts of the system. So, to make this process as seamless as possible, here is your step-by-step guide to adding users and granting permissions. Remember: To add a Shared Access User, they must already be a contact in the Group(s) you want to give them access to. Adding Users Step 1: Login to the master account Step 2: Click on Settings > Account Step 3: Select the ‘Shared Access’ tab Step 4: Select the Group you would like to add the additional users to Step 5: Click on ‘Give Shared Access Right to One of Your Contacts’ Note: The user must be stored as a contact in your CRM Step 6: Type in their email address and hit ‘Save’ Step 7: Toggle all boxes that correspond to the permissions/access to features you would like them to have. Tip: Press the Step 8: Hit the
Quickly Edit Shared Access Permissions Step 1: Hit the Contacts Tab Step 2: Select the contact that you would like to edit permissions for Step 3: Pull up their contact record and select the Groups Tab Step 4: The list of groups that they are in will appear. Hit the ‘Edit Shared Access’ button, and deselect or select all permissions for that contact
So, there you have it. Now, go ahead, add users and get them excited about using GreenRope! If you have any questions, please feel free to contact support@greenrope.com at any time. |

