GreenRope Blog
Title search: ✖
|
Show All (635)
#CoolerChat (7) All About GreenRope (172) Content Marketing (66) CRM (190) Customer Experience (79) Digital Transformation (8) Email Marketing (6) Event Recaps (2) Everything Small Business (46) How-To (136) In the Clearing with Lars (25) Infographics (4) Marketing (149) Marketing Automation (60) Monthly Updates (25) Press Release (1) Sales (76) SMB (140) Social Media (20) Tidbits for You (116) Websites & SEO (4) Weekly Roundup (16)
10 Surprising Things You Didn't know about Client Services & Search Marketing Manager, Lisa Frampton
Disqualifying Leads Without Alienating Them as Future Customers - Part 2: Cultivating Non-Leads with Automated Marketing
4 Ways to Get Your Email Marketing in Front of the Right Audience Through Personalization & Segmentation
Total Cost of Ownership: What does it mean and how can you avoid costly, unsuccessful implementations.
|
Using Custom Objects to Create an Interactive Client Portalby Madison Potter Creating a custom-made client portal is now available on GreenRope, and we couldn’t be more excited about this new feature. Most GreenRope Users use a signup form, live chat, ticketing form or a simple ‘Update Profile’ link to collect data from their clients. While these methods may be great for basic and/or initial data collection, what happens when you need to collect additional, more complex information from your contacts and clients? A client portal can help simplify and streamline this process. For example, do you require specific documents and data from new clients? With a client portal your contacts can go into their profile (client portal) and update their information themselves. This saves you valuable time, making it easy for your client to get you the information needed without all the back and forth. What is a Client Portal?A Client Portal is a secure online webpage specifically tied to an individual contact record. The contact can login to view, manage, and update their profile information, as well as upload documents in real time. With GreenRope, your client portal is a more comprehensive profile update page. The data collected is readily available in the CRMs contact record, streamlining the data/document collection process and making it easy to reference right from within your CRM. A client portal is specific to the person you’re working with and can only be accessed through the unique URL you provide. Even though the client has open access to this data, your company has full control into which fields are editable versus view only. You can also request and control the documents to be uploaded through this portal. The Client Portal relies on the use of GreenRope’s custom objects feature, so continue reading to learn more about this feature and how to properly setup your custom objects and client portals in GreenRope. The Benefits of a Client Portal?Before you start setting up the client portal, establish how you will be using this feature. How does the client portal fit into your current business process? Why will a client want to go into this portal? What data and/or documents need to be collected? Understanding exactly what the client needs to do in this portal helps you create the specific type of “Custom Objects” to achieve this outcome and simplify the whole customer experience. Unlike a user field, custom objects allow you to create a one-to-many relationship which basically allows you attach multiple objects to a contact or company record. You’ll create these specific fields with the hierarchical structure in mind, by using the object definitions and attaching several attributions in each object requested. We will discuss how to set these up as well, but you can review this overview of custom objects to get started. Basically, custom objects are specific and detailed fields created for the client to access and work with. It is important to note that a client portal is different from a membership site and member login, although membership sites often use the convenient Profile Update Placeholder feature to embed a Client Portal right into the website. A membership site pertains to individual group membership which allows access to special content that is only available to members of a group, whereas a client portal simply allows the end user to update their information and upload documents right into their CRM contact record. A client will access the “Client Portal” to:
Benefits of creating custom Client Portals:
Whatever the purpose for your client portal, it will help streamline the data collection process and increase transparency throughout your organization. A client portal ultimately increases your organization’s efficiency and overall customer experience. Our client portals are available at every subscription level, and can be accessed through the “Apps” > “Custom Objects” section of your account. How to Setup Your Client Portal (In GreenRope)
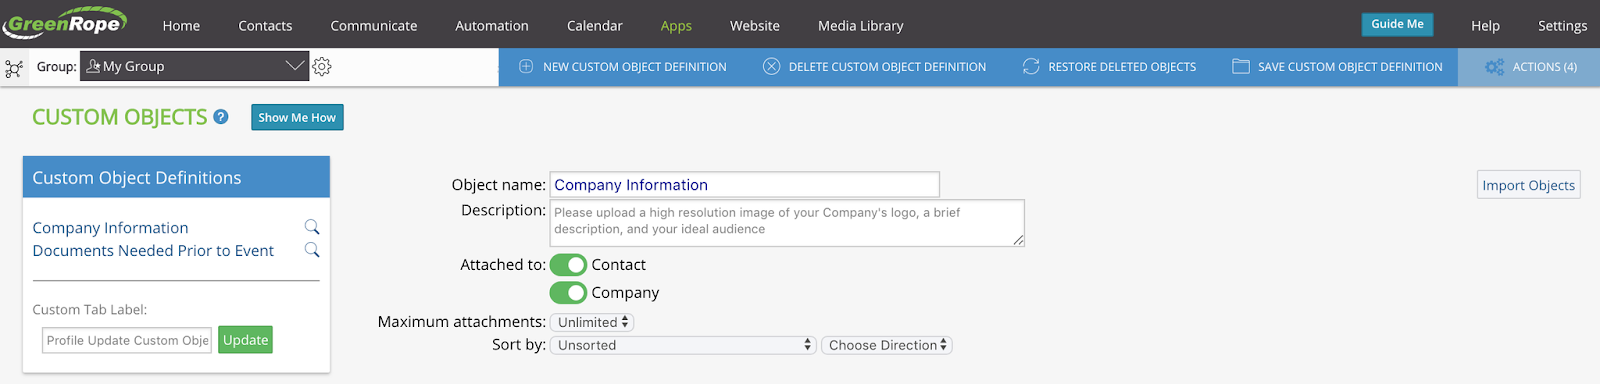
Within your GreenRope Account, hover over the “Apps” tab and select the “Custom Objects” option from the dropdown. Once on the Custom Objects page, simply hover over the “Actions” drawer (located in the upper right hand corner) to create new objects and also to save any changes made. Within the new custom object, you’ll specify the object name, as well as a description to help the contact understand what data or documents are needed as they pertain to that specific custom object. Each new custom object will be easily accessible to view or edit within the ‘Custom Object Definitions’ box on the left side of this page. This also serves as a good reference for your team to review when it’s added to their CRM record later. Custom Objects can be associated with contacts or companies, and multiple objects can be associated with a contact or company. Once defined in the custom objects tab, any objects you create will automatically update within the system in real time. Next, we will set up the custom objects “attributes,” which are the various options and fields for your client to update. These attributes can be set with default values, making data entry easier and faster. Each attribute can be set to ‘show on initial load’ so each GreenRope User can have certain fields visible when the contact record details is first pulled up. Any fields not set to “Show On Initial Load” means this attribute will be hidden until you click the “view details” link to show all of the hidden attributes. For example, you might use this if there are a large amount of attributes and you want to highlight the main options for the clients. Lastly, each attribute requires a specific format for the information you’re collecting, we call this the type of attribute. Each custom object can store information in the following type formats:
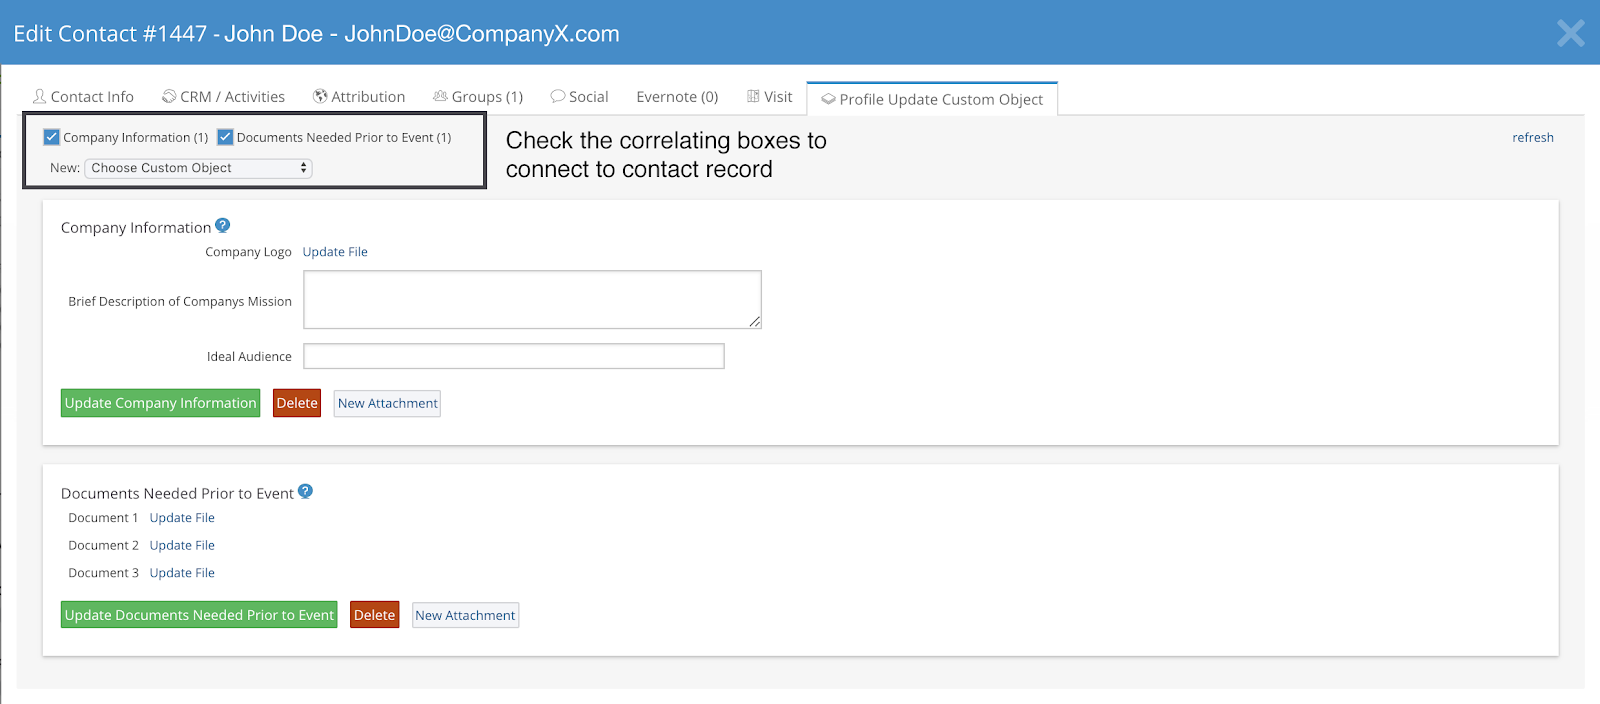
Once you’ve added all the necessary descriptions, it’s time to hover over the “Actions” drawer and save your new custom object. Upon refresh, your new custom object appears in the blue box on the left of the page. The image below shows an overview of what we’ve discussed thus far. Below the new “Custom Object Definitions” that you’ve saved, there will be a “Custom Tab Label” box. This section allows you to define a label for how you want to store these custom objects in your contact (or company) records within the CRM. For this example, it is “Profile Update Custom Object,” however, you’ll want to customize this label to reflect the data being collected and stored from your clients. We suggest not capitalizing this custom tab name as this is the label that shows up when you call up the contact record. The heading specified in the “Custom Tab Label” field essentially creates an entirely new tab in the contact record which you’ll access the data and store this information within the contact’s record. To give you a simple example on how you could create your custom portal, here’s a test custom objects set up. For this example, we want our contact to upload three documents into this portal, and we want that option to show as soon as they load the page. Your team will specify the “Object Name” (which would be the documents needed) and then create as many “attributes” that you’d like the client to view, edit, or upload (in this case, it’s three file type documents to upload). Once saved, the new custom object created is stored within the blue box on the left. You can edit this custom object by clicking on it, or by dragging and dropping the custom objects into the order you want them to be shown. Again, hover over the “Actions” drawer to save your new objects. This Custom Objects page is where you create and store all the custom objects throughout your account. Next, we have to adjust what the client sees when they look into their portal, including which fields are visible and editable. 2. Adjust the Client Portal PermissionsLike many other features within your GreenRope account, these permissions are group specific. To get into your Group Settings page, either click on the gear icon to the right of your groups dropdown menu or go into your “Settings” > “Group” on the top-right of your page. Next, click on the “Email/Web Options” tab and scroll all the way down to the “Profile Update Management” section. The client portal permissions are on the same page as the ‘Update Profile’ section, and the custom objects created previously are listed below in green. Since you are working on the same page, you can also adjust the ‘Profile Update Fields’ shown here to view or hide any information from the client’s portal. The top fields are the default fields within the contact’s record, while the custom objects you just created are located in green below. The green custom objects have their heading (the custom object’s name) along with the specified attributes. To further manage the fields seen or editable by different user levels, there are two columns to specify this. The left column reflects any client’s view when updating the information in their portal, as seen below. Whereas the right column is used to track a user once they have logged into your GreenRope system, for example an inactive group member. To set what can be seen or edited by the client, simply check the appropriate box associated with either the view only (eye icon) or editable (pencil icon) boxes. Leave them both unchecked to hide a custom object’s attribute. Once you’ve set the appropriate permissions save your changes using the green ‘Save Changes’ button, or hover over the ‘Actions’ drawer above. 3. Attach it to the Contact’s RecordOnce we activate the custom object for this contact, all uploaded information will also update the respective CRM record. For example, not all contacts will need to see or edit every custom object you’ve created in the system. Now, we will need to go into the contact record and specify which documents or fields you would like to be associated with this contact record in the CRM. Since this is a unique client portal, you’ll want to set up the objects for each of the contacts you would like to have update their information. To do this, please go into your specific client’s contact record (Contacts > View > Edit). Within this “Edit Contact” page, you’ll now see a new tab with the label you previously set-up when creating the custom objects. In the John Doe example below, the tab heading reads “Profile Update Custom Object” but you’ll create your own tab label to reflect the data being collected in your client portal. To activate the custom objects and attributes to show for John’s portal, simply check the custom object headings and save. As a business, you can manually update the client’s information on this page as well. However, the main drive behind client portals is to free up your time by providing the client access to their own portal. 4. Share the Portal with the ClientsSince this Client Portal is located on the same page as the Profile Update section, you’ll be using the same “Profile/Unsub” link to send your client to the portal as you would to the profile page. As you see below, click on the “Profile/Unsub” icon within the WYSIWYG Toolbox to generate a link, as it is already directly connected to the person’s profile who clicks on it in their email inbox. You can either use the generic link provided, or you customize the wording or embed the link as a button. The best use case is be to double click on the “Profile/Unsub” link that’s generated to locate the embedded placeholder version (i.e. ) - copy this placeholder. Now, embed it into a custom button using the “Button” icon as seen below. This creates a better CTA (call to action) for your client to take the desired action, you can customize this button to match your branding. Make sure the contacts or companies you’re sending this “client portal email” to are already contacts within your CRM. This custom client portal you’re creating is directly attached to the individual contact or company record within your account and so will update accordingly. What the client seesWhen John Doe clicks on the link (or button) sent to him via email, he is directed to his custom client portal to update his information and upload the requested documents. In this article, this is what we have set up for John to see when he goes to the unique URL provided. The data collected is automatically stored within his contact record, in the custom tab we created, for consolidation and reference. Every client portal can be completely customized, and serves as another tool to help consolidate and streamline your data collection process. Overall, setting up this client portal should be relatively easy by creating the custom objects, adjusting the permissions in the group settings, attaching it to the contact record, and finally sending it out to the client. Setting up your client portals today will help put the client in control of uploading their information, which saves your business time, increases efficiency and makes for a better, more complete customer experience overall.
|